Drywall How To Manual
Drywall Home | History | Tools | Preparation | Materials | Wallboard InstallationMudding | Finishing Up | Patching | Outlet Install
|
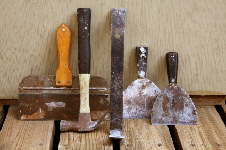
Drywall Mudding or PlasteringMudding is a colloquial term for plastering. Either word will do, but mudding is more expressive of the mess the average beginner will have made by the time he or she is done learning the ropes of this process. If there is art in drywalling then it lies in the plastering. I once heard a professional plasterer say that he covered a multitude of sins. What he meant was, that no matter how crude the job of hanging the wallboard was performed, he could make the job look nice. And he could. Mudding is actually a fairly simple, step-by-step process. In effect all the peaks and valleys on a wall or ceiling are smoothed over by the application of plaster. The first step is to place a quantity of plaster in your hod by digging it out of its bucket with the six-inch knife. Approach the wall with an artiste's eye and then apply the mud to every valley by smearing it on in broad strokes, with the knife pressed firmly to the wall.
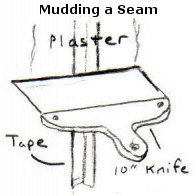
When you get to a seam between two pieces of drywall, apply mud to the crack and then tear off a piece of paper tape the length of the seam. Press it lightly into the mud and over the seam. Now put another coat of mud over the paper with your 10 or 12-inch knife. Repeat this process until the entire wall is covered. Try to make the wall as smooth as possible. Though you will be tempted at first to perfect the work you are doing with the application of more or less plaster, it is best to simply run through the process. Often a final touch-up stroke, performed by the inexperienced, will only prompt the need for another stroke, ad infinitum. Interior corners are approached in a manner similar to seams - mud, tape, more mud, smooth. However, this process is made much easier with the use of a corner knife for the final smoothing. Next, you simply let the mud dry. Give the bumps a light sanding, with drywall sandpaper (if necessary) and then give another coat where needed. As the plaster generally shrinks slightly, more than one coat is almost always necessary in order to fill in the holes and the gaps between drywall. Repeat this process until you have smooth walls. A safety note: Be sure to wear a face mask and goggles when sanding to prevent dust from getting in your eyes and lungs. |
Mudding | Finishing Up | Patching | Outlet Install
Contact Us | Privacy Statement | Laptop Repairs