Drywall How To Manual
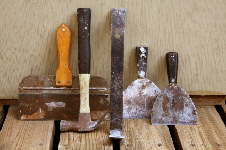
Drywall Home | History | Tools | Preparation | Materials | Wallboard InstallationMudding | Finishing Up | Patching | Outlet Install
|
Wallboard InstallationHanging drywall is not a precise science, but accurate measuring can be an important factor in making certain that a sheet goes up right the first time. Before you begin, realize that sheets of drywall may be placed on the wall vertically, horizontally and, if you make a mistake, even backwards. Most people prefer to place drywall vertically, because it avoids the problem of having to completely lift sheets into the air. Working alone this will be an advantage. But sometimes, especially if the height of the wall is non-standard, it is better to mount the boards horizontally. Ultimately, when the job is done, no one will know which way you did it.
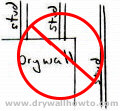
A good rule of thumb to remember is that every sheet should meet every other sheet at the middle of a stud in the frame as you go across. The easiest way to remember this is that there should never be a corner that is not secured to a stud.
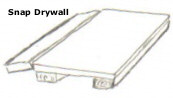
Anyone who has worked with drywall knows that it is relatively easy to bend or break. The corners crumble if dropped on the edges. This seeming flimsiness may at first seem a disadvantage, but the fact is this weakness is the real advantage of drywall. It makes it relatively light, and exceptionally easy to cut. To cut a piece of drywall, simply score a line where you want the cut to be. Bend the board at the score and it will snap very close to the line. Using your utility knife, score the crease on the other side of the board. It's that easy. No electric saws necessary. To cut an "L", score the board in the same way and then cut down the shortest leg with your keyhole saw. Then bend, snap, and cut the backside, of the longer leg, in the same way you made the straight cut. Of course, you will want to cut holes in the plane of the drywall for small openings, such as electrical outlets, switches, small windows, etc. The easiest way to do this is to lay the wallboard on its face. Measure the height and width of the opening and where it should be. Draw the opening on the face of the wallboard. Then it is best to trace the pencil marks with your utility knife. A good keyhole saw can be jammed through 1/2-inch drywall with the heel of your hand (or pounded through with a hammer). You can also create an opening for the keyhole saw with a power drill. Cut out the openings. If for some reason, you did everything backwards, don't worry, on standard drywall, the back-side may be used, and if you do a good job mudding and painting, no one will ever know. Next prop the wallboard onto a shim and push it next to the wall. Holding it flat to the surface beginning at about 3/8-inch from the top place nails (in groups of two) in every stud which the wallboard covers. The groups of two should be 12 to 16 inches apart along the stud's line. For beginners especially, you may wish to mark on the wallboard where this stud line is with a chalk line. When pounding in the nails be sure to create a slight dimple in the drywall, but do not drive the nail so hard as to crumble the drywall. (The reason for this dimple will become obvious when you begin to lay on the plaster.) If you happen to miss the stud with the nail, pull the nail out because a loose nail may create problems for your plaster-smooth finish later. There are little valleys on the edge of the sheets. This will also help with mudding later, but do not worry if you cannot always connect two valleys together or if there are no valleys at all between seams. The mudding process will still make a beautiful and even wall.
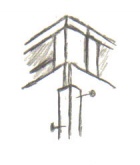
Protruding corners are a special case. You will want to be sure to apply drywall corners. These are a kind of angled piece of metal that is nailed into the stud over the applied drywall that is attached to the frame. It forms a beaded edge that allows ease in the application of plaster and also provides protection for the wall from bumps, scrapes, and wear and tear. The drawing at left shows how the corner should be applied, with the understanding that the corner, as well as the drywall would actually go all the way to the ceiling.
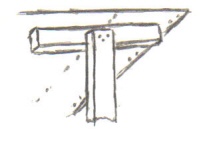
Ceilings are done pretty much the same as walls. The one difference being, how do you get the drywall up there? It is fairly heavy and almost impossible for one person to lift and secure at the same time (though I have done it with a step ladder and a strained neck). You can build two "T"s from two by fours. Cut one 2X4 in half and nail it cross-wise to the top of a 2X4 that is about the height of your ceiling. Be sure to nail on the horizontal board slightly higher than the end of the vertical board to prevent scratches. Use two of these props to hold up the drywall sheet until it is adequately secured to the ceiling by nails or screws. There are machines that are designed specifically to lift drywall to the ceiling. They can often be rented at a fairly reasonable price.
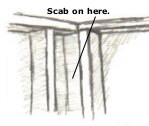
Cover the entire surface in this manner, making sure to avoid those hanging corners. If you have a place where a whole side of the board is unattached, you can "scab on" a 2X2 to the frame to create a place to secure the drywall. Scabbing on is frequently necessary at corners where two walls meet or where a ceiling meets a wall and the joists are running parallel with the wall. When the wallboard has been hung, the next step is to plaster. |
Mudding | Finishing Up | Patching | Outlet Install
Contact Us | Privacy Statement | Laptop Repairs